Wednesday, May 23, 2012

FreeSWITCH Installation on Citrix XenServer

This is one of the easiest posts I've ever made. I'll show how to install FreeSWITCH which is only 5~7 lines of work but first we need to declare and install the prerequisite OS, UBUNTU 1.04 Server and even before that need to create a new Virtual Machine on my XENSERVER using XENCLIENT.

ADDING NEW VM USING XENCENTER ON XENSERVER

Simple Click on "NEW VM"
Next Step will give lots of predefined templates which come with xenserver and include multiple OSs like windows and linux servers. But I wanted to install an Operating System of my own choice and my own settings so I selected Other Install Media from the templates.
Using Other Install Media as Template
Once we continue from the last step we'll be given option to Install OS from an ISO library or Physical DVD drive of the xen-server. Since we can't have access to physical server's DVD ROM all the time so using an ISO library is the best idea. I had already created an "New ISO Library" which pointed to a CIFS directory ( Uses Windows network shared folder in simple words)

I've Ubuntu Server 11.04 server ISO placed in my windows shared folder

Select which XENSERVER to create this Virtual Machine
 Using XENCENTER we can have multiple xenservers under our control so we may select which xenserver to create this new VM on. Since I've only one experimental xenserver, so I selected that one.
Assign CPUs and Memory to VM
 Easy step, just tell XENSERVER how much memory and how manay CPUs to assign to this new VM.
Create a Disk Storage [HDD} for VM
 Another standard step of assigning HDD capacity to this VM on xenserver.

Select Capacity and Storage Space for VM-HDD
 The important point and good to note here is that XENSERVER/XENCENTER gives us the capability to not only use the internal Harddisk of thexen-server but instead we can use Network Storage systems as well like NAS or SAN or FC(Fiber Channel)
Selecting xenserver's storage as storage space of new VM
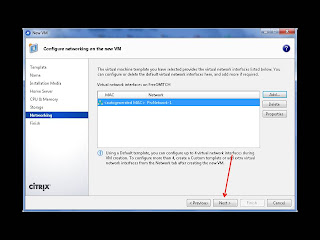
Next steps are easier as well, just create a new NIC for our virtual machine and assign it to default network-0 or any other network created  on the xenserver. This means that we can define multiple switches and create separate networks within the xen-server. Managing traffic is easier if we use Virtual Routers like vyatta. See my previous post on how I control internet traffic between VMs using vyatta.


 Finally everything is setup just press the finish button and ta-da, another server is ready and now time to install Operating System on this new server.


INSTALL UBUNTU ON NEW Vitual Machine

Follow this post by one of my senior senior friend on step-by-step Ubuntu Server installation guide to install OS on the newly created Virtual Machine.

SETTING UP SSH ACCESS TO NEW VM

Since I assigned this new Virtual machine a private network with Private IP: 192.168.30.4. According to my virtual router's configurations in this post This IP can access internet but I definitely need to add another Destination NAT rule in my router to gain SSH access from outside world to this server.

Now when I SSH on 172.16.31.101 port 22304 it gets translated to internal address 192.168.30.4 port 22.

GW-Vyatta#set nat destination rule 10 inbound-interface eth0
GW-Vyatta#set nat destination rule 10 destination port 22304
GW-Vyatta#set nat destination rule 10 translation address 192.168.30.4
GW-Vyatta#set nat destination rule 10 translation port 22
GW-Vyatta#set nat destination rule 10 protocol tcp
GW-Vyatta#commit


This is How it looks like now


INSTALLING FREESWITCH on UBUNTU SERVER

Now the final phase of this post, installing our favorite VoIP Server FreeSWITCH. SSH into the FS server and on console execute these commands.

Download pre-requisite libraries and packages for FreeSWITCH.

FS-Server:#apt-get update
FS-Server:#apt-get install gcc bison flex make openssl libmysqlclient15-dev libradiusclient-ng-dev mysql-server libxmlrpc-c3-dev subversion subversion-tools automake1.9 gcc-4.1 autoconf make wget libtool g++ debhelper automake1.9 autoconf libtool unixodbc-dev libasound2-dev libssl-dev libogg-dev libvorbis-dev libperl-dev libgdbm-dev libdb-dev libgnutls-dev libspandsp-dev libtiff4-dev libncurses5 libncurses5-dev screen bridge-utils libmysql++-dev libconfuse-dev libpcre3-dev curl libxml2-dev libmemcache-dev build-essential git-core
Download freeswitch source code. This takes a long time downloading almost 80~100 MB of data on slower network.
FS-Server:#cd /usr/local/src
FS-Server:#git clone git://git.freeswitch.org/freeswitch.git
Build configurations file required for compiling FreeSWITCH.
FS-Server:#cd freeswitch
FS-Server:#./bootstrap.sh
./configure sets compilation options
FS-Server:#./configure

At this point you can edit the file "modules.conf" to include any modules you like to be installed with your freeswitch setup.
Now execute make and make install commands to compile and create binary files.


FS-Server:#make && make install
Now Sit back and do something usefull (:P), hopefully if no errors are encountered then it'll take approximately 7~15 minutes.
Once it completes you can follow the printed instructions to install any additional sound files if you like.

At the end just put symoblic Links:

FS-Server:#ln -s /usr/local/src/freeswitch/bin/freeswitch /usr/sbin/
FS-Server:#ln -s /usr/local/src/freeswitch/bin/fs_cli /usr/sbin/
Now, Start FreeSWITCH server for the first time.
FS-Server:#cd /
FS-Server:#freeswitch -nc
FS-Server:#fs_cli -r
Thats it You're now connected to FreeSWITCH console. 

Next thing I'm going to do is setup my virtual topology such that SIP Users registering on OpenSIPS can make calls to FreeSWITCH and they get a two-way audio. I'll be using Media-Proxy (hopefully) and echo application in FreeSWITCH to test this. Till then bye-bye.

Saturday, May 19, 2012

OpenSIPS DB-Authentication with Multi-Domain Support

OpenSIPS DB-Authentication with Multi-Domain Support

Starting from the basics, I'm going to show how to use the factory default opensips.cfg file and make it use MySQL DB to authenticate any incoming SIP REGISTER attempt. The default file without any changes will successfully register any user with any password, which in most of the cases is obviously not required.

open up the opensips.cfg file

root@Osips-SBC:~#vim /etc/opensips/opensips.cfg


Starting from enabling the required modules to be loaded

Un-comment  (remove the #)  this line to load the MySQL DB connector module
#loadmodule "db_mysql.so"

Uncomment these modules to load the authentication mechanism
#loadmodule "auth.so"
#loadmodule "auth_db.so"
#loadmodule "alias_db.so"

Uncomment the domain module to enable multi-domain support
#loadmodule "domain.so"

Enable the presence modules

#loadmodule "presence.so"
#loadmodule "presence_xml.so"

Set "usrloc" module parameters to save the SIP user-locations into MySQL DB persistently.

#modparam("usrloc", "db_mode",   2)
#modparam("usrloc", "db_url",
#     "mysql://opensips:opensipsrw@localhost/opensips")

Set the authentication_db modules parameters to point to the desired Database.  

#modparam("auth_db", "calculate_ha1", yes)
#modparam("auth_db", "password_column", "password")
#modparam("auth_db", "db_url",
#     "mysql://opensips:opensipsrw@localhost/opensips")
#modparam("auth_db", "load_credentials", "")


Uncomment DB parameters of Aliases_DB module

#modparam("alias_db", "db_url",
#     "mysql://opensips:opensipsrw@localhost/opensips")

Uncomment DB parameters of Domain module

#modparam("domain", "db_url",
#     "mysql://opensips:opensipsrw@localhost/opensips")
#modparam("domain", "db_mode", 1)   # Use caching


Enable modules to differentiate between different domains.
#modparam("auth_db|usrloc|uri", "use_domain", 1)

Set presence modules parameters.


#modparam("presence|presence_xml", "db_url",
#     "mysql://opensips:opensipsrw@localhost/opensips")
#modparam("presence_xml", "force_active", 1)
#modparam("presence", "server_address", "sip:192.168.30.3:5060")


Now in the main route uncomment the following code blocks so that whenever we receive a REGISTER request it verifies its credentials (from DB). If you let these blocks commented any SIP REGISTER request will be successful without any verification.

This is required to authenticate the incoming methods except REGISTER, this is useful in case any undefined user(hacker) tries to make calls from your SIP-Proxy.

       ##if (!(method=="REGISTER") && is_from_local())  /*multidomain version*/
       ##{
       ##      if (!proxy_authorize("", "subscriber")) {
       ##              proxy_challenge("", "0");
       ##              exit;
       ##      }
       ##      if (!db_check_from()) {
       ##              sl_send_reply("403","Forbidden auth ID");
       ##              exit;
       ##      }
       ##
       ##      consume_credentials();
       ##      # caller authenticated
       ##}

NOTE: Don't uncomment the "# caller authenticated" line.

And this block needs to be uncommented to Authenticate REGISTER requests.

 ##if (!www_authorize("", "subscriber"))
               ##{
               ##      www_challenge("", "0");
               ##      exit;
               ##}
               ##
               ##if (!db_check_to())
               ##{
               ##      sl_send_reply("403","Forbidden auth ID");
               ##      exit;
               ##}
  

Once done, Save and Exit. Optionally its Always good to add few extra log lines to see whats going on inside your OpenSIPS. logs lines are important to debug and troubleshoot the configuration file.

xlog("L_NOTICE","[$pr:$fU@$si:$sp]: Processing '$rm' \n");

Put this line Just before the if conditions we uncommented above then save the file.

next thing is define SIP users in OpenSIPS DB
For this first edit the follwoing file.


root@Osips-SBC:~# vim /etc/opensips/opensipsctlrc


Set the SIP DOMAIN and OpenSIPS Database Username/Password.
## your SIP domain
SIP_DOMAIN=192.168.30.3
This will be default domain used if no domain at user definition time is given.

## database read/write user
DBRWUSER=opensips

## password for database read/write user
DBRWPW="opensipsrw"

Save and Exit

Add domains to be used by opensips


root@Osips-SBC:~#mysql -uopensips -popensipsrw opensips


mysql>insert into domain(domain,last_modified) VALUES ("192.16.30.3", now())
mysql>insert into domain(domain,last_modified) VALUES ("saevolgo.com", now())


Restart OpenSIPS

root@Osips-SBC:~#/etc/init.d/opensips restart

Now Add SIP Users.

root@Osips-SBC:~# opensipsctl add 10022 pass10022word
new user '10022' added

root@Osips-SBC:~# opensipsctl add 10022@saevolgo.com passw0rd
new user '10022@saevolgo.com' added

Now try registering both users changing realm and password for both and make sure that 10022 user defined for realm "saevolgo.com" works with only its defined passw0rd and not with "pass10022word".

Friday, May 18, 2012

Vyatta+OpenSIPS on Citrix XEN-Server


Setting up Environment

Couple days ago I had to expand my Virtual environment to install more virtual machines and do some more experimentation, so instead of using VMware ESXi, I used Citrix XENServer
It was a good experience installing xenserver, just a matter of putting in the installation CD and then following steps.
Once I was done installing the xenserver, the first step was to create new virtual servers inside and setup the internal networking.For networking part the obvious choice was Vyatta (VYATTA CORE 6.4). 
Here is the setup diagram
Virtual Server Space - Network Topology
Setting up ISO Library in XenCenter was really easy. I used the downloaded Vyatta-virtual-64bit ISO anda Ubuntu Server ISO to install both Vyatta - routing and firewall,  and a Ubuntu Server- OpenSIPS server.

I assigned two NICs to Vyatta one being bridged to physical interface to interact with the outer world the second interface is connected to a virtual switch created inside the xenserver to communicate with the internal servers.

OpenSIPS server on the other hand is connected only to the virtual switch and uses the Vyatta router as its gateway. I had to configure NAT on the Vyatta router for this to work.

Here's how we do NAT on Vyatta to let the traffic coming from private network successfully reach out to the internet.
GW-Vyatta:~$configure
GW-Vyatta#set interfaces ethernet eth0 address 172.16.31.101/16 
GW-Vyatta#set system gateway-address 172.16.2.50 
GW-Vyatta#set system name-server 8.8.8.8 
GW-Vyatta#commit
Verify that Router can itself reach out to internet.
GW-Vyatta#ping www.google.com
Start SSH Service on Vyatta router
GW-Vyatta#set service ssh listen-address 172.16.31.101
GW-Vyatta#commit
Configure the LAN interface on eth1.
GW-Vyatta#set interfaces ethernet eth1 address 192.168.30.1/24
GW-Vyatta#commit
Set Masquerade NAT for traffic from LAN to get translated to WAN address.

GW-Vyatta#set nat source rule 5 outbound-interface eth0
GW-Vyatta#set nat source rule 5 source address 192.168.30.0/24
GW-Vyatta#set nat source rule 5 translation address masquerade
GW-Vyatta#commit
Ping some internet destination from the LAN side and see some new translations on Vyatta.


W-Vyatta#run show nat source statistics
Configure SSH access to OpenSIPS Server such that when I SSH on 172.16.31.101 port 22303 it gets translated to internal address 192.168.30.3 port 22.
GW-Vyatta#set nat destination rule 5 inbound-interface eth0
GW-Vyatta#set nat destination rule 5 destination port 22303
GW-Vyatta#set nat destination rule 5 translation address 192.168.30.3
GW-Vyatta#set nat destination rule 5 translation port 22
GW-Vyatta#set nat destination rule 5 protocol tcp
GW-Vyatta#commit
SSH onto the OPenSIPS server via port 172.16.31.101:22303 and see the destination NAT stats.
GW-Vyatta#run show nat destination statistics

GW-Vyatta#save
GW-Vyatta#exit

That was it and I can access internet from my OpenSIPS server and also SSH into my server from outside the virtual environment. The next thing would be to make this setup work with two-way audio. For that I may need to setup VPN or something IDK.

Thursday, May 17, 2012

Installing OpenSIPS on Ubuntu-Server 11.04 (Natty)


OpenSIPS is a SIP server, I don't think I can explain this all myself so copying from the project's main page


What OpenSIPS is
OpenSIPS (Open SIP Server) is a mature Open Source implementation of a SIP server. OpenSIPS is more than a SIP proxy/router as it includes application-level functionalities. OpenSIPS, as a SIP server, is the core component of any SIP-based VoIP solution. With a very flexible and customizable routing engine,OpenSIPS 'unifies voice, video, IM and presence services in a highly efficient way, thanks to its scalable (modular) design.
What OpenSIPS has to offer, comes in a reliable and high-performance flavour - OpenSIPS is one of the fastest SIP servers, with a throughput that confirms it as a solution up to enterprise or carrier-grade class.

Now moving onwards with steps to install the SIP server.

First update the repository and package indexes to install the latest available pakcages.

root@OSIPS_SBC# apt-get update
Install the required libraries/packages
root@OSIPS_SBC# apt-get install build-essential openssl bison flex mysql-server libmysqlclient16 libmysqlclient-dev libsctp-dev openssl libssl-dev libradiusclient-ng-dev libxml2-dev libxml2 libconfuse0 libconfuse-dev libdb-dev libcurl4-gnutls-dev libcurl3 libpostgresql-ocaml-dev libpq-dev unixodbc-dev libpcre3-dev libexpat1-dev libjson0-dev libmemcached-dev libmemcache-dev libxmlrpc-c3-dev libgeoip-dev python-dev libsnmp-dev 


Download and extract opensips source tarball

root@OSIPS_SBC# wget http://opensips.org/pub/opensips/1.7.2/src/opensips-1.7.2_src.tar.gz
root@OSIPS_SBC# tar zxvf opensips-1.7.2_src.tar.gz 
root@OSIPS_SBC# cd opensips-1.7.2-tls/

UPDATE: The newer OpenSIPS version (1.8 onwards) don't need to edit Makefile and select the packages like below. Visit the lastes blog-post on OpenSIPS+Cassandra Integration to see how that works. (Hint: make menuconfig)

Edit "Makefile" to include your required modules.

root@Osips-SBC# vim Makefile

Uncomment the following lines to enable their functionality.
TLS=1
SCTP=1

Include modules to be installed.

Comment out this all directive:

exclude_modules?= b2b_logic jabber cpl-c xmpp rls \
mi_xmlrpc xcap_client db_mysql db_postgres db_unixodbc \
db_oracle db_berkeley aaa_radius osp perl snmpstats \
perlvdb carrierroute mmgeoip presence presence_xml presence_mwi \ presence_dialoginfo pua pua_bla pua_mi pua_usrloc \ 
pua_xmpp pua_dialoginfo ldap h350 identity regex memcached \ db_http json python dialplan

it should look something like this,

exclude_modules?= osp db_oracle \

#exclude_modules?= b2b_logic jabber cpl-c xmpp rls \
#mi_xmlrpc xcap_client db_mysql db_postgres db_unixodbc \
#db_oracle db_berkeley aaa_radius osp perl snmpstats \
#perlvdb carrierroute mmgeoip presence presence_xml\ 
#presence_mwi presence_dialoginfo pua pua_bla pua_mi \ 
#pua_usrloc pua_xmpp pua_dialoginfo ldap h350 identity \
#regex memcached db_http json python dialplan

I've excludede modules for osp and oracle db , as we don;t need those.

save and exit.
Now compile and install OpenSIPS

root@Osips-SBC# make all 
root@Osips-SBC# make install 
Copy default and the int.d startup scripts to relevant directories.
root@Osips-SBC# cd packaging/debian
root@Osips-SBC# cp opensips.default /etc/default/opensips
Edit the default file:
root@Osips-SBC# vim /etc/default/opensips 
SET:
RUN_OPENSIPS=yes
Save and Exit

root@Osips-SBC# cp opensips.init /etc/init.d/opensips
Verify the binary directory of opensips package
root@Osips-SBC# ls /usr/local/sbin/opensips

should show you this output
/usr/local/sbin/opensips

Edit /etc/init.d/opensips to know the path of the opensips executable binary

root@Osips-SBC# vim /etc/init.d/opensips

SET:
DAEMON=/usr/local/sbin/opensips

Create opensips user
root@Osips-SBC# useradd -d /etc/opensips -s /sbin/nologin opensips

SCTP module is required to be loaded in kernel before starting opensips, since e compiled opensips with SCTP support.

root@Osips-SBC# modprobe sctp


START opensips

root@Osips-SBC# /etc/init.d/opensips start
if you get this error:

grep: /etc/opensips/opensips.cfg: No such file or directory
Starting opensips: opensips already running.

Execute the following command.( but first do check with "/var/log/syslog" what is your error.I got error on different configurations directory so I created an symbolic link.)

root@Osips-SBC# ln -s /usr/local/etc/opensips /etc/


Create Database for opensips


root@Osips-SBC# cd /usr/local/etc/opensips 
root@Osips-SBC# vim opensipsctlrc
Uncomment
DBENGINE=MYSQL

Save and Exit
root@Osips-SBC# opensipsdbctl create

MySQL password for root:
INFO: test server charset
INFO: creating database opensips ...
INFO: Core OpenSIPS tables succesfully created.
Install presence related tables? (y/n): y
INFO: creating presence tables into opensips ...
INFO: Presence tables succesfully created.
Install tables for imc cpl siptrace domainpolicy carrierroute userblacklist? (y/n): y
INFO: creating extra tables into opensips ...
INFO: Extra tables succesfully created.
root@Osips-SBC#


Now, Start opensips
root@Osips-SBC# /etc/init.d/opensips start
Starting opensips: opensipsListening on
             udp: 127.0.0.1 [127.0.0.1]:5060
             udp: 192.168.30.3 [192.168.30.3]:5060
             tcp: 127.0.0.1 [127.0.0.1]:5060
             tcp: 192.168.30.3 [192.168.30.3]:5060
             sctp: 127.0.0.1 [127.0.0.1]:5060
             sctp: 192.168.30.3 [192.168.30.3]:5060
Aliases:
             sctp: Osips-SBC:5060
             sctp: localhost:5060
             tcp: Osips-SBC:5060
             tcp: localhost:5060
             udp: Osips-SBC:5060
             udp: localhost:5060

.
root@Osips-SBC#
The "." here signifies that opensips has actually started. If you see anything else like "opensips has started" or "opensips is already running" then see log file for errors.

Verify that opensips is running
root@Osips-SBC# ps -ef | grep opensips


opensips  1140     1  0 14:16 ?        00:00:00 /usr/local/sbin/opensips -P /var/run/opensips/opensips.pid -m 64 -u opensips -g opensips


opensips  1147  1140  0 14:16 ?        00:00:00 /usr/local/sbin/opensips -P /var/run/opensips/opensips.pid -m 64 -u opensips -g opensips
opensips  1148  1140  0 14:16 ?        00:00:00 /usr/local/sbin/opensips -P /var/run/opensips/opensips.pid -m 64 -u opensips -g opensips
opensips  1149  1140  0 14:16 ?        00:00:00 /usr/local/sbin/opensips -P /var/run/opensips/opensips.pid -m 64 -u opensips -g opensips
opensips  1150  1140  0 14:16 ?        00:00:00 /usr/local/sbin/opensips -P /var/run/opensips/opensips.pid -m 64 -u opensips -g opensips
opensips  1151  1140  0 14:16 ?        00:00:00 /usr/local/sbin/opensips -P /var/run/opensips/opensips.pid -m 64 -u opensips -g opensips
opensips  1152  1140  0 14:16 ?        00:00:00 /usr/local/sbin/opensips -P /var/run/opensips/opensips.pid -m 64 -u opensips -g opensips
opensips  1153  1140  0 14:16 ?        00:00:00 /usr/local/sbin/opensips -P /var/run/opensips/opensips.pid -m 64 -u opensips -g opensips
opensips  1154  1140  0 14:16 ?        00:00:00 /usr/local/sbin/opensips -P /var/run/opensips/opensips.pid -m 64 -u opensips -g opensips
opensips  1155  1140  0 14:16 ?        00:00:00 /usr/local/sbin/opensips -P /var/run/opensips/opensips.pid -m 64 -u opensips -g opensips
opensips  1156  1140  0 14:16 ?        00:00:00 /usr/local/sbin/opensips -P /var/run/opensips/opensips.pid -m 64 -u opensips -g opensips
opensips  1157  1140  0 14:16 ?        00:00:00 /usr/local/sbin/opensips -P /var/run/opensips/opensips.pid -m 64 -u opensips -g opensips
opensips  1158  1140  0 14:16 ?        00:00:00 /usr/local/sbin/opensips -P /var/run/opensips/opensips.pid -m 64 -u opensips -g opensips
opensips  1159  1140  0 14:16 ?        00:00:00 /usr/local/sbin/opensips -P /var/run/opensips/opensips.pid -m 64 -u opensips -g opensips
opensips  1160  1140  0 14:16 ?        00:00:00 /usr/local/sbin/opensips -P /var/run/opensips/opensips.pid -m 64 -u opensips -g opensips
opensips  1161  1140  0 14:16 ?        00:00:00 /usr/local/sbin/opensips -P /var/run/opensips/opensips.pid -m 64 -u opensips -g opensips
opensips  1162  1140  0 14:16 ?        00:00:00 /usr/local/sbin/opensips -P /var/run/opensips/opensips.pid -m 64 -u opensips -g opensips
opensips  1163  1140  0 14:16 ?        00:00:00 /usr/local/sbin/opensips -P /var/run/opensips/opensips.pid -m 64 -u opensips -g opensips
opensips  1164  1140  0 14:16 ?        00:00:00 /usr/local/sbin/opensips -P /var/run/opensips/opensips.pid -m 64 -u opensips -g opensips
opensips  1165  1140  0 14:16 ?        00:00:00 /usr/local/sbin/opensips -P /var/run/opensips/opensips.pid -m 64 -u opensips -g opensips
opensips  1166  1140  0 14:16 ?        00:00:00 /usr/local/sbin/opensips -P /var/run/opensips/opensips.pid -m 64 -u opensips -g opensips
opensips  1167  1140  0 14:16 ?        00:00:00 /usr/local/sbin/opensips -P /var/run/opensips/opensips.pid -m 64 -u opensips -g opensips
opensips  1168  1140  0 14:16 ?        00:00:00 /usr/local/sbin/opensips -P /var/run/opensips/opensips.pid -m 64 -u opensips -g opensips
opensips  1169  1140  0 14:16 ?        00:00:00 /usr/local/sbin/opensips -P /var/run/opensips/opensips.pid -m 64 -u opensips -g opensips
opensips  1170  1140  0 14:16 ?        00:00:00 /usr/local/sbin/opensips -P /var/run/opensips/opensips.pid -m 64 -u opensips -g opensips
root      1175  1274  0 14:20 pts/0    00:00:00 grep --color=auto opensips
root@Osips-SBC#

Thats all, you've successfully installed OpenSIPS. Now I'll try to upload some configurations sample file for load-balancing multiple Media-Servers(Asterisks/FreeSWITCH) servers using OpenSIPS.